CentOS7へTLS/SSL(Let's Encrypt)を導入しよう
Webサーバーで、暗号化通信(HTTPS)は必須になってきました。ここでは無償で取得できるLet's EncryptのTLS/SSL証明書を使用します。
Webコンテンツを暗号化で保護するHTTPSプロトコルにはTLS/SSL証明書が必要ですが、数年前までは発行料の高安はともかく有料で発行されるものだったので、多くのWebサイトはHTTP(非暗号)が当然でした。ショッピングや銀行など保護すべきデータがあるときは当然HTTPSですが、会員サイトであってもHTTPの場合がありました。
2014年に設立されたLet's Encryptは、2016年より公式の認証局として活動しています。
Let's Encryptが発行するTLS/SSL証明書では、企業実在性の証明や運用組織名の表示が出来ないので、単に情報保護や改竄防止などができれば十分というサイトに向いています。
TLS証明書の発行に当たって、事前に発行したいドメイン名やサブドメイン名がDNSへ登録されている必要があります。ここでは、当面次のドメインが必要となるのでその手順を記載します。
ドメイン名は、"hiroski.com"をそれぞれに読み替えてください。
hiroski.com       (当サイトドメイン)
www.hiroski.com   (Webサーバー用)
mail.hiroski.com (メールサーバー用)
certbotをインストール
最初に、certbotというLet's EncryptのTLS証明書の取得を行うパッケージをインストールします。
$ sudo yum install certbot python2-certbot-apache
certbotの詳細については本家を参照してください。
CentOS 7では、My HTTP website is running "Apache" on "CentOS/REHL 7" を選択すると実行に必要なコマンドを例示します。
事前に、yum-utils を有効にせよとありますが、さくらのVPSでは最初から有効になっていました。
次に証明書の取得を実行といきたいところですが、certbotは、Apacheの定義ファイルを読み込み証明書が必要なドメインの検出と、必要な変更を行ってくれます。
定義ファイルを準備し動作を確認します(01-hiroski.com.conf と 前記事01-exsample.com.confは重なります)。
/etc/httpd/domain.d/01-hiroski.com.conf
<VirtualHost *:80>
  ServerName www.hiroski.com
  ServerAlias hiroski.com
  DocumentRoot /usr/home/foo/www/htdocs
  CustomLog /usr/home/foo/www/log/access_log combined env=!nolog
  ErrorLog /usr/home/foo/www/log/error_log
  Alias /cgi-bin/ "/usr/home/foo/www/cgi-bin/"
  <Directory /usr/home/foo/www/htdocs>
    Options FollowSymLinks ExecCGI
    AllowOverride All
    Require all granted
  </Directory>
  <Directory /usr/home/foo/www/cgi-bin>
    Options FollowSymLinks ExecCGI
    AllowOverride All
    Require all granted
  </Directory>
</VirtualHost>
/etc/httpd/domain.d/02-hiroski.com-ssl.conf
<VirtualHost _default_:443>
  ServerName www.hiroski.com
  ServerAlias hiroski.com
  DocumentRoot /usr/home/foo/www/htdocs
  ErrorLog /usr/home/foo/www/log/ssl_error_log
  TransferLog /usr/home/foo/www/log/ssl_access_log
  LogLevel warn
  Alias /cgi-bin/ "/usr/home/foo/www/cgi-bin/"
  <Directory /usr/home/foo/www/htdocs>
    Options FollowSymLinks ExecCGI
    AllowOverride All
    Require all granted
  </Directory>
  <Directory /usr/home/foo/www/cgi-bin>
    Options FollowSymLinks ExecCGI
    AllowOverride All
    Require all granted
  </Directory>
</VirtualHost>
定義ファイルを準備したら、httpdは再起動しておきます。
$ sudo systemctl reload httpd
certbotは、Apacheの定義ファイルを検索し、443ポートを見つけたら必要なディレクティブを定義ファイルへ追加し、Apacheを再起動してくれます。
複数ドメイン(サブではなく)を運用しているときの、このコマンドの動作は確認していません。
$ sudo certbot --apache
HTTPSを適用するドメインや、HTTPでアクセスがあったときにHTTPSへリダイレクトするか聞かれます。ドメインはそのままEnterで問題ありません。
Saving debug log to /var/log/letsencrypt/letsencrypt.log
Plugins selected: Authenticator apache, Installer apache
Starting new HTTPS connection (1): acme-v02.api.letsencrypt.org

Which names would you like to activate HTTPS for?
- - - - - - - - - - - - - - - - - - - - - - - - - - - - - - - - - - - - - - - -
1: hiroski.com
2: www.hiroski.com
- - - - - - - - - - - - - - - - - - - - - - - - - - - - - - - - - - - - - - - -
Select the appropriate numbers separated by commas and/or spaces, or leave input
blank to select all options shown (Enter 'c' to cancel): Enter
Obtaining a new certificate
Deploying Certificate to VirtualHost /etc/httpd/domain.d/02-hiroski.com-ssl.conf
Deploying Certificate to VirtualHost /etc/httpd/domain.d/02-hiroski.com-ssl.conf

Please choose whether or not to redirect HTTP traffic to HTTPS, removing HTTP access.
- - - - - - - - - - - - - - - - - - - - - - - - - - - - - - - - - - - - - - - -
1: No redirect - Make no further changes to the webserver configuration.
2: Redirect - Make all requests redirect to secure HTTPS access. Choose this for
new sites, or if you're confident your site works on HTTPS. You can undo this
change by editing your web server's configuration.
- - - - - - - - - - - - - - - - - - - - - - - - - - - - - - - - - - - - - - - -
Select the appropriate number [1-2] then [enter] (press 'c' to cancel): 2
Redirecting vhost in /etc/httpd/domain.d/01-hiroski.com.conf to ssl vhost in /etc/httpd/domain.d/02-hiroski.com-ssl.conf

- - - - - - - - - - - - - - - - - - - - - - - - - - - - - - - - - - - - - - - -
Congratulations! You have successfully enabled https://hiroski.com and
https://www.hiroski.com

You should test your configuration at:
https://www.ssllabs.com/ssltest/analyze.html?d=hiroski.com
https://www.ssllabs.com/ssltest/analyze.html?d=www.hiroski.com
- - - - - - - - - - - - - - - - - - - - - - - - - - - - - - - - - - - - - - - -

IMPORTANT NOTES:
 - Congratulations! Your certificate and chain have been saved at:
   /etc/letsencrypt/live/hiroski.com/fullchain.pem
   Your key file has been saved at:
   /etc/letsencrypt/live/hiroski.com/privkey.pem
   Your cert will expire on 2020-07-15. To obtain a new or tweaked
   version of this certificate in the future, simply run certbot again
   with the "certonly" option. To non-interactively renew *all* of
   your certificates, run "certbot renew"
 - If you like Certbot, please consider supporting our work by:

   Donating to ISRG / Let's Encrypt: https://letsencrypt.org/donate
   Donating to EFF: https://eff.org/donate-le
何度かcertbotを試していたので上記には表示されていませんが、初回certbot実行時には次を表示します。(初回は他サイトを参照し、certbot --authenticator standalone --installer apache -d ...... としていたので多少異なるかもしれません)
メールアドレスの登録、サービス規約に同意するか、メールアドレスをEFF等で共有してよいか、が聞かれます。
Enter email address (used for urgent renewal and security notices) (Enter 'c' to
cancel): メールアドレス
Starting new HTTPS connection (1): acme-v02.api.letsencrypt.org

- - - - - - - - - - - - - - - - - - - - - - - - - - - - - - - - - - - - - - - -
Please read the Terms of Service at
https://letsencrypt.org/documents/LE-SA-v1.2-November-15-2017.pdf. You must
agree in order to register with the ACME server at
https://acme-v02.api.letsencrypt.org/directory
- - - - - - - - - - - - - - - - - - - - - - - - - - - - - - - - - - - - - - - -
(A)gree/(C)ancel: A

- - - - - - - - - - - - - - - - - - - - - - - - - - - - - - - - - - - - - - - -
Would you be willing to share your email address with the Electronic Frontier
Foundation, a founding partner of the Let's Encrypt project and the non-profit
organization that develops Certbot? We'd like to send you email about our work
encrypting the web, EFF news, campaigns, and ways to support digital freedom.
- - - - - - - - - - - - - - - - - - - - - - - - - - - - - - - - - - - - - - - -
(Y)es/(N)o: N
証明書が発行されているか確認します。
$ sudo certbot certificates
Saving debug log to /var/log/letsencrypt/letsencrypt.log

- - - - - - - - - - - - - - - - - - - - - - - - - - - - - - - - - - - - - - - -
Found the following certs:
Certificate Name: hiroski.com
Domains: hiroski.com www.hiroski.com
Expiry Date: 2020-07-15 23:38:46+00:00 (VALID: 89 days)
Certificate Path: /etc/letsencrypt/live/hiroski.com/fullchain.pem
Private Key Path: /etc/letsencrypt/live/hiroski.com/privkey.pem
- - - - - - - - - - - - - - - - - - - - - - - - - - - - - - - - - - - - - - - -
各定義ファイルには次が追加されました。
01-hiroski.com.conf
(途中略)
 </Directory>
RewriteEngine on
RewriteCond %{SERVER_NAME} =hiroski.com [OR]
RewriteCond %{SERVER_NAME} =www.hiroski.com
RewriteRule ^ https://%{SERVER_NAME}%{REQUEST_URI} [END,NE,R=permanent]
</VirtualHost>
httpからhttpsへリダイレクトが追加。httpが必要な場合はコメントアウトします。IPアドレスでアクセスしたときにhttps://ドメイン/へリダイレクトするときは定義ファイル(ここでは、00-default.conf)へ同様の追加をします。
02-hiroski.com-ssl.conf
(途中略)
 </Directory>
Include /etc/letsencrypt/options-ssl-apache.conf
SSLCertificateFile /etc/letsencrypt/live/hiroski.com/cert.pem
SSLCertificateKeyFile /etc/letsencrypt/live/hiroski.com/privkey.pem
SSLCertificateChainFile /etc/letsencrypt/live/hiroski.com/chain.pem
</VirtualHost>
Includeディレクティブで追加された"options-ssl-apache.conf"はLet's Encryptでの推奨設定のようです。
/etc/letsencrypt/options-ssl-apache.conf
# Intermediate configuration, tweak to your needs
SSLProtocol all -SSLv2 -SSLv3 -TLSv1 -TLSv1.1
SSLCipherSuite ECDHE-ECDSA-AES128-GCM-SHA256:ECDHE-RSA-AES128-GCM-SHA256:ECDHE-ECDSA-AES256-GCM-SHA384:ECDHE-RSA-AES256-GCM-SHA384:ECDHE-ECDSA-CHACHA20-POLY1305:ECDHE-RSA-CHACHA20-POLY1305:DHE-RSA-AES128-GCM-SHA256:DHE-RSA-AES256-GCM-SHA384
SSLHonorCipherOrder off
SSLCompression off
SSLOptions +StrictRequire
SSLHonorCipherOrder ディレクティブは、サーバー主導での暗号選択なのでonでよいと思います。
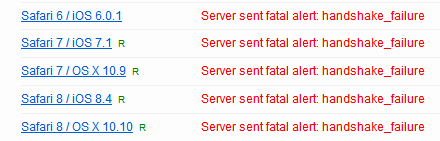
この推奨設定を使用すると、古いいくつかのデバイスが接続出来なくなるようです。
SSL Labs Server Testの結果は、Rating Aですが、
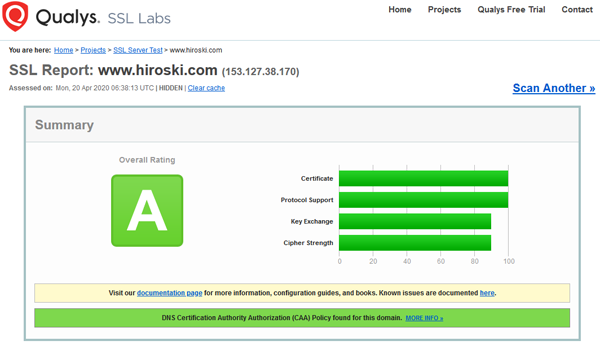
次のデバイスは接続できません。さらに古いTLSv1のみのデバイスは接続できません。
SSLCipherSuiteディレクティブに "openssl ciphers -v" でTLSv1.2対応の暗号スイートを列記すると上記デバイスをクリアできますが、暗号スイートのいくつかはよろしくないようで、RatingはBになりました。
また、さくらのVPS(CentOS7)にインストールされているOpenSSHパッケージはバージョンが 1.0.2kで、TLSv1.3をサポートしていません。
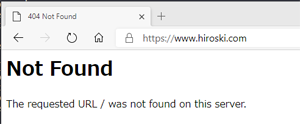
HTTPSの動作を確認しますが
TLS証明書のセットアップが完了したので、さっそくHTTPSでアクセスします。
https://www.hiroski.com/
ドキュメントが入っていないので、404 Not Foundです。
別名である、https://hiroski.com/ は、証明書に問題があるようです。
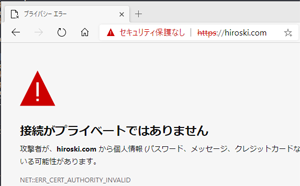
原因は、"/etc/httpd/conf.d/ssl.conf"がApacheインストール状態のままで、https://hiroski.com/のときに、Apacheインストール時に組み込まれたローカルな証明書を読み込んでいたからでした。
"/etc/httpd/conf.d/ssl.conf"から、<VirtualHost> ディレクティブ内を削除し、httpdを再起動します。
$ sudo cp -p /etc/httpd/conf.d/ssl.conf /etc/httpd/conf.d/ssl.conf.org
$ sudo vim /etc/httpd/conf.d/ssl.conf
(<VirtualHost> ディレクティブ内を削除)

$ sudo systemctl restart httpd
再度、https://hiroski.com/をアクセスして問題ないことを確認します。
"/etc/httpd/conf.d/ssl.conf"から<VirtualHost> ディレクティブ内を削除したので、いくつかのディレクティブの設定も削除となりました。
削除した内容を"02-hiroski.com-ssl.conf"の<VirtualHost> ディレクティブ内下端に追加します(MSIEの記述はもう古すぎるように思いますが、実際どうなるのでしょうか)。
#SSLOptions +FakeBasicAuth +ExportCertData +StrictRequire
<Files ~ "\.(cgi|shtml|phtml|php3?)$">
 SSLOptions +StdEnvVars
</Files>
# Notice: Most problems of broken clients are also related to the HTTP
# keep-alive facility, so you usually additionally want to disable
# keep-alive for those clients, too. Use variable "nokeepalive" for this.
# Similarly, one has to force some clients to use HTTP/1.0 to workaround
# their broken HTTP/1.1 implementation. Use variables "downgrade-1.0" and
# "force-response-1.0" for this.
BrowserMatch "MSIE [2-5]" \
 nokeepalive ssl-unclean-shutdown \
 downgrade-1.0 force-response-1.0

# Per-Server Logging:
# The home of a custom SSL log file. Use this when you want a
# compact non-error SSL logfile on a virtual host basis.
CustomLog logs/ssl_request_log \
 "%t %h %{SSL_PROTOCOL}x %{SSL_CIPHER}x \"%r\" %b"
https://IPアドレス/でアクセスされると、発行された証明書とはCommon nameが一致しないので接続に問題がある旨表示されてしまいます。通常訪問者はこれ以上進みませんが、そのまま進むと443ポートをデフォルト定義したサイトをIPアドレスで表示されます。ここはデフォルトのServerNameで表示されてさせたいので、HTTPと同様に追加します。
RewriteEngine on
RewriteCond %{SERVER_NAME} =IPアドレス
RewriteRule ^ https://サーバー名%{REQUEST_URI} [END,NE,R=permanent]
以上で、Apacheで定義したサイトに必要な証明書を取得できましたが、メール(postfix/dovecot)で使用するmail.hiroski.comの証明書は取得できていません。
メール用の証明書を追加しよう
つづいて、取得した証明書にmail.hiroski.comを追加します。
mail.hiroski.comはApacheで定義していないので、certbotをstandaloneモードで内蔵ウェブサーバーで動作させます。必ずcertonlyで実行します。mailサブドメインはWebサーバーの定義に存在しないので、Apacheの定義ファイルへ予期せぬの変更があると混乱がおきます。
--expandで証明書を拡張するとき、既取得を含め全てを列挙します。
$ sudo systemctl stop httpd
$ sudo certbot certonly --standalone --expand -d hiroski.com -d www.hiroski.com -d mail.hiroski.com

$ sudo systemctl start httpd
Saving debug log to /var/log/letsencrypt/letsencrypt.log
Plugins selected: Authenticator standalone, Installer None
Starting new HTTPS connection (1): acme-v02.api.letsencrypt.org
Renewing an existing certificate

IMPORTANT NOTES:
 - Congratulations! Your certificate and chain have been saved at:
   /etc/letsencrypt/live/hiroski.com/fullchain.pem
   Your key file has been saved at:
   /etc/letsencrypt/live/hiroski.com/privkey.pem
   Your cert will expire on 2020-07-16. To obtain a new or tweaked
   version of this certificate in the future, simply run certbot
   again. To non-interactively renew *all* of your certificates, run
   "certbot renew"
 - If you like Certbot, please consider supporting our work by:

Donating to ISRG / Let's Encrypt: https://letsencrypt.org/donate
Donating to EFF: https://eff.org/donate-le
最終的に取得した証明書のドメインです。
$ sudo certbot certificates
Saving debug log to /var/log/letsencrypt/letsencrypt.log

- - - - - - - - - - - - - - - - - - - - - - - - - - - - - - - - - - - - - - - -
Found the following certs:
 Certificate Name: hiroski.com
  Domains: hiroski.com mail.hiroski.com www.hiroski.com
  Expiry Date: 2020-07-16 00:16:20+00:00 (VALID: 89 days)
  Certificate Path: /etc/letsencrypt/live/hiroski.com/fullchain.pem
  Private Key Path: /etc/letsencrypt/live/hiroski.com/privkey.pem
証明書の自動更新を設定しよう
TLS証明書を取りっぱなしでは、90日の有効期限を過ぎて失効してしまいます。
certbotコマンドをcronで定期的に実行すれば、失効の30日前に更新できます。
以下では、毎日3時に自動更新を実行します。--pre-hook、--post-hookはcertbot実行前後のコマンド指定です。
$ sudo crontab -e
(以下を追加)
00 03 * * * /usr/bin/certbot renew --pre-hook "/bin/systemctl stop httpd" --post-hook="/bin/systemctl start httpd"
証明書の無効化について
なんらかの都合で、OSを再インストールするなど証明書が消えてしまうときには、事前に証明書を無効化します。無効化せずに取り直しを繰り返すと回数制限にかかるようです。
$ sudo certbot revoke --cert-name=exsample.com
Saving debug log to /var/log/letsencrypt/letsencrypt.log
Starting new HTTPS connection (1): acme-v02.api.letsencrypt.org

- - - - - - - - - - - - - - - - - - - - - - - - - - - - - - - - - - - - - - - -
Would you like to delete the cert(s) you just revoked, along with all earlier
and later versions of the cert?
- - - - - - - - - - - - - - - - - - - - - - - - - - - - - - - - - - - - - - - -
(Y)es (recommended)/(N)o: y

- - - - - - - - - - - - - - - - - - - - - - - - - - - - - - - - - - - - - - - -
Deleted all files relating to certificate hiroski.com.
- - - - - - - - - - - - - - - - - - - - - - - - - - - - - - - - - - - - - - - -

- - - - - - - - - - - - - - - - - - - - - - - - - - - - - - - - - - - - - - - -
Congratulations! You have successfully revoked the certificate that was located
at /etc/letsencrypt/live/hiroski.com/fullchain.pem

- - - - - - - - - - - - - - - - - - - - - - - - - - - - - - - - - - - - - - - -
フォローしませんか?


コメント